Follow Us

Hi everyone, I am relatively new to the blogging scene, but I will be adding helpful articles regularly. However, it is impossible to cover everything to do with renovating, so if you would like to join my email community you will receive updates as they are uploaded to my blog.
My All Renovations website will be and running soon and there will be plenty of helpful hints and articles for you to look through.
Remember, Renovating should be FUN!

To join our community just type in you email address and hit subscribe. Cheers!
(Note: No subscriber information is ever given to any other parties)

Subscribe to our mailing list

* indicates required

Thursday, 17 December 2015


OUR LATEST PROJECT  (Part 3)

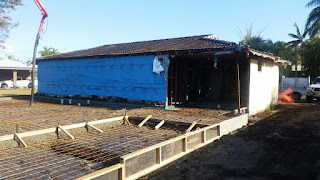
Part 3 of our project brings us to the framing stage. it is a good feeling once the ground works have been completed. The excavating and the placement of the foundation steelwork is always a dirty hot job, so getting out of the ground is a nice change.
When ordering the necessary materials, it makes good sense to make sure that you have as much of the materials delivered in the one trip. I was once told by another successful builder that I had worked for many years ago, was to always have plenty of product onsite. His exact words were, "Have a pile of timber too high to jump over". His reasoning made sense.

Firstly, leaving the job site to get materials will cost time and money. Not only do you waste your time but having tradesmen standing around at $40 per hour will soon eat into your profit margin.
Secondly, delivery costs vary depending on the distances travelled. One delivery cost can be as high as $300 so having as much product delivered on the one truck makes perfect sense.

There can be a downside to this depending on a few variables. One is theft. 
Yes unfortunately, a lot of building materials, and even tools are stolen from building sites.
Another can be restricted access around the site itself so you need to spend some time organising the project ahead of time. 

Frame stage always seems to surprise the owners when they see it for the first time. It really shows them the size of their project.


 This renovation definitely needed a lot of thought at the design stage mainly because we had to incorporate the new design into the existing building. As careful as one can be designing and drawing the plans, there are always some discrepancies that pop up during the actual framing stage. This project was no different.


One thing remains the same for all building projects. Careful planning. This I find, is probably the one thing that will save you time and money.

My next post will show the building frame and roof sheeting complete.

Cheers!


Thursday, 22 October 2015

OUR LATEST PROJECT  (Part 2)

Demolish and start again, or use what is there?

Making the wrong decision here may cost you money or save you money.
This was a major decision that had to be made before we started this new renovation.
The existing house is a small brick veneer that was badly in need of repair caused by a leaking bathroom and some severe termite damage. Even though the external and internal wall frames were constructed using hardwood, the damage was significant however, it was not enough to warrant demolishing the entire structure.

The main termite damage was in the bathroom area where the constant water leak occurred. Also, some of the roof trusses were affected but the damage was minimal.

Our very first job was to lift the existing concrete slab along the back wall. Over the years, the house had dropped at the back corner by 50mm so with some excavation work, we rectified it.

We bought five 20 ton jacks, one for each hole but before we could do any lifting, we needed to bore 450mm diameter holes down to 3 meters deep. 

We also had to excavate the rectangular area shown under the existing concrete footings and deep enough to fit the jack under. This was no easy feat as the ground is what we call glue pot, sticky black soil.
Once this was completed five times, we place the steel cages in position ready for concrete.


The round part of the cage extended down to 3 meters deep while the head was 800mm x 500mm x 500mm.

All five of these cages were held up into position by ropes tied to timber that was set across the holes. The concrete was then poured to cover the cages but low enough for our jacks.


The concrete was then left for some weeks to cure enough for us to begin the lifting.
We had set up our laser level inside of the house to monitor the levelling. Bit by bit we lifted each section a few millimetres at a time until we had reached our final height.
We then filled the holes with concrete and entombed the jacks. Job Done!

A 50mm fall from one end of the house to the other does not sound like much over 15 meters or so but if it is not rectified before commencing the new section, it can cause many problems during the project. Stabilizing the existing dwelling is paramount especially where the two sections join. 

This type of work definitely needs the expertise of a qualified engineer. Our choice is Cornell Engineers. Check out their website for helpful information at www.cornellengineers.com.au


Stay tuned for part 3 where we have set up the new concrete footings and slab.

Cheers for now!


Monday, 5 October 2015


OUR LATEST PROJECT

It has been quite sometime since I have posted anything because every waking moment has been used attending to our small business. Not that I am complaining. The economy in our area has taken a severe dive since the end of the coal mining boom resulting in very little work for all businesses not just the construction industry.
This new project involves an extension to this existing old brick veneer. The extension is not just stuck onto the back, but is fully incorporated into he whole building going from this to this.


All of the existing concrete roof tiles will be taken off and the entire building will have corrugated steel roof sheeting. The inside of the existing section has had all of the wall and ceiling sheets removed. New cyclone tie downs will be installed along with some minor rectification of the hardwood frame.

The existing dwelling is 129/m2 but with the new addition of a garage, carport, patio and new living area, brings the total to 325/m2. 
The living areas inside have high raking ceilings with flat ceilings in the bedroom and bathroom areas.
The addition of a sauna makes a nice feature.


A new pool will be situated to this view of the rear of the house around final construction time.

Many times is can be less expensive to convert an existing dwelling into something new and special. If designed properly, the use of the existing space can save you lots of money.
I will be adding regular updates on the progress of the different stages to show you just what goes into building a new and improved home.

Cheers for now!


Sunday, 22 March 2015

Bad Workmanship

                                                              Bad Workmanship

It truly amazes me when I see some of the workmanship that is apparently acceptable today. Honestly, I cannot understand how this is allowed to happen especially in this modern age of technology and tools.
Take a look at this concrete foot path that is a walkway and a ramp for the disabled.
The stones that you see are part of a garden that has a 45 degree slope down to the main street footpath. Where is edge beam, (or Rat wall as we sometimes call it)?

The steel reinforcement is actually protruding out from the bottom of the concrete slab.
Seriously, what kind of incompetent fool can think that this is acceptable. This was done on a commercial project, so where the hell was the pre-pour inspection?

Firstly, the steel reinforcing was not set up to be in the correct place in the slab, and secondly, how hard is it to dig a small edge beam at least down to the point of intrusion to keep the under slab fill from pouring out from the edges. Also, the steel that can be seen will rust to the point of breaking the concrete path which will then require total demolition of the path and starting again.

By now you can probably sense that I am rather angry. Too right I am!
It is rubbish like this that gives all trades people a bad name, but the people that built this appalling piece of junk are certainly NOT trades people. And what of the so called inspector that passed this. Most likely it wasn't checked.

When people employ someone to perform a task, be it construction or any other industry, they rightfully expect fair work for payment, not sub standard work or product.
As I have mentioned in one of my previous articles, cutting corners to save a few dollars will always cost more in the long run and usually it is at the expense of the original customer.

I have seen way too much of this over the years and I believe that it is getting worse. It is not hard to build something properly. I have put these pathetic attempts of construction down to at least 3 things. Don't Care, Pure Laziness and Cutting Corners to save a few bucks!

Everyone makes mistakes but examples like this are not innocent mistakes. This project I believe should be totally rectified one way or another and the full cost should be taken on by all parties concerned except the client, who by the way, has received a very bad deal.

I welcome anybody that has had a bad experience like this to send me any information and pictures and will I gladly publish them on my blog. This kind of thing definitely needs to be published far and wide at least to make the paying public more aware.

Please use this email address, allrenovations@outlook.com to send your info. If you choose not to have your details published just add, Remain Anonymous, in the subject line.

People who pay someone for a service place their money and trust on the line and should rightfully expect value for money. Unfortunately, there are unscrupulous operators out there that continue to carry out sub standard work and are no where to be found once a problem has occurred.

Stay tuned for my next article where I will provide a checklist on what to do and what to look for should you need to employ the services of any contactor.

Cheers for now.


Wednesday, 14 January 2015

CUTTING CORNERS = SAVING MONEY.
TRUE or FALSE?

In my experience the answer is FALSE. Having said that, there are some exceptions.
When it comes to skimping on product and or time, it will always come back to bite you.

There is a big difference between spending a small amount of time and money making something look better, and cutting corners where you just shouldn't. A prime example is a bathroom renovation.

Most older bathrooms are generally beyond a quick makeover and need to be totally renovated. That means completely removing everything from the room and starting again.
In some cases, an old bathroom can still be in reasonably good condition, so it may not require total demolition, particularly if there are no leaks in the shower or bath area and vanity unit.

Here are some low cost solutions you can do to give your tired old bathroom a brand new look.

1. Remove the old grout from the wall and floor tiles and re-grout. While this is a tedious and time consuming job, it will be worth while. You must be very careful not to chip any tiles while doing this. There are various tools that you can use to do this.

2. Remove all existing mould and silicon sealant from around the shower or bath perimeter.
Clean and dry these areas thoroughly and apply new sealant. This must be done neatly or the finished job will look worse than what you had started with.

3. A new paint job will make a huge difference and this can usually be done without too much trouble or expense if you do it yourself. Most professional painters don't charge very much but finding one that will do the smaller jobs can prove to be difficult sometimes.

4. After the new paint job, it definitely pays to change any fixtures and fittings in the room such as power point and light switch covers, towel rails, shelving and alike. Once the room has a fresh coat of paint, it makes all of the old fittings stand out.

5. Change any tap ware that looks old or scratched. In a lot of cases, chrome plated tap ware and fittings only need to be cleaned. If the chrome plating is not chipped or peeling, just use some detergent and some steel wool to bring them back to life.

6. If you have a glass shower screen, then the glass will more than likely have a build up of scum on it. This is caused from the type of water and personal cleaning products that you are using. Soaps and conditioners can cause a build up that can actually eat into the glass itself and can be impossible to remove. Most standard framed shower screens aren't that expensive to replace should the old ones be beyond repair.

7. Sometimes vanity units are still in reasonable condition if they have not been subjected to constant water and if they were of a good quality when they were originally installed. If the top itself is still ok, but the doors and draws are in need of some attention, than there are a few ways to fix them. The first is to make a new set, but this can be a little expensive so most times they can be covered with a new material. There are many products that can be used for this and can be bought from most home improvement centres.

8. Finally, the addition of some plants, pictures or wall ornaments can really lift the room.
Vibrant towels and floor mats will definitely improve the look. These things can always be changed if and when you would like a new theme for your bathroom.

Just remember, smoking over your bathroom, as I like to call it, is only ever a good idea if there are no real water leak problems and is in a reasonable condition to start with.

Happy Renovating!


Wednesday, 31 December 2014

Tuesday, 23 December 2014

Merry Christmas Everyone!

Hi everyone, just a quick update and to thank all my suppliers and contractors for their great work throughout this tough year. We will be back in the new year bigger and better, with a range of brand new home designs that will be an affordable alternative to what is already on the market. Our renovation sector remains strong and we will always be there to take care of all your renovations and repairs.

In the past, our new home sector mainly concentrated on the one off designs plus the more larger projects, which has been great but I now feel the we can offer more to the low to mid range area, but I can assure you that they will not lack in quality and quantity for the price.

Here are a few pictures of the last bathroom renovation for 2014.
Thanks to everyone for the support.
Merry Christmas from Charlie and Judy.


Basic but functional.